Share this
![]() Alexander Jansen
on Sep 30, 2025 10:19
| Updated: Feb 10, 2026 16:58
Alexander Jansen
on Sep 30, 2025 10:19
| Updated: Feb 10, 2026 16:58
 Once you’ve chosen Google Cloud as your platform, the next big step is laying a strong foundation. Without it, even the most innovative applications can run into scalability, security, or compliance challenges.
Think of the landing zone as the blueprint of your cloud environment. It provides structure, separation of responsibilities, and guardrails to ensure that your team can move fast without compromising on security or governance.
In this article, we’ll walk through how to design and implement a landing zone on Google Cloud, using the example of a fintech company that needs to process payments safely and efficiently.
What is a Landing Zone?
A Landing Zone is a starting template for establishing a secure, scalable, and manageable infrastructure on Google Cloud. It is essentially a foundation. it enables you to systematically design all critical aspects, such as security, networking, identity management, policy, and cost control, from the outset. This ensures you have a solid infrastructure in place before you begin developing your application.
Google Cloud Landing Zone Components
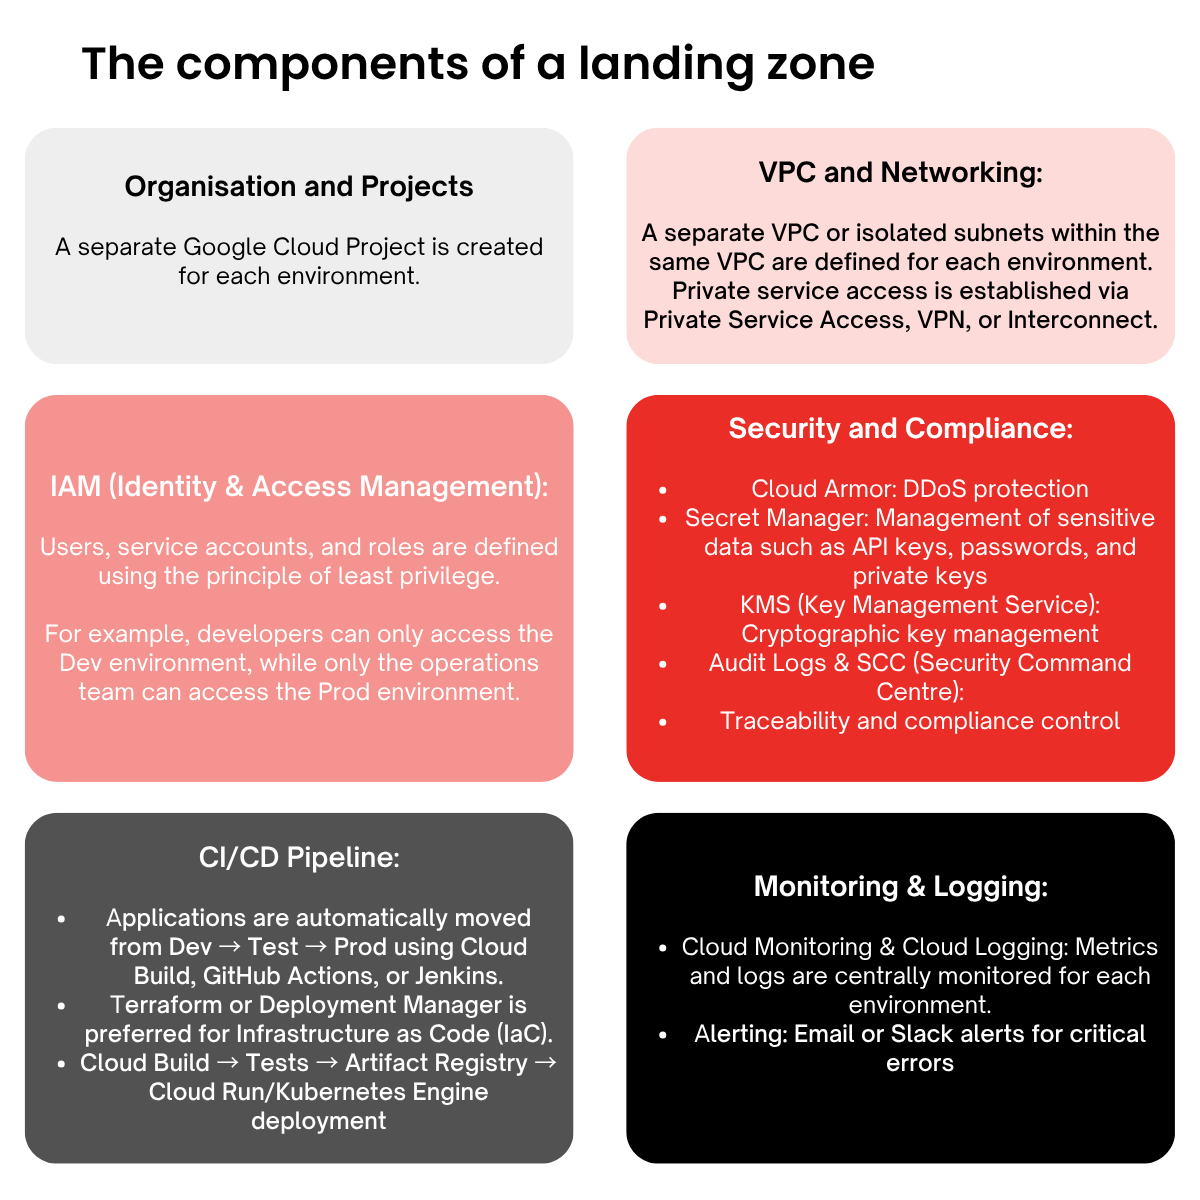
The components of a landing zone can be grouped into several categories:
Organisation and Projects:
A separate Google Cloud Project is created for each environment. IAM policies, budgets, and billing are managed separately.
IAM (Identity & Access Management):
Users, service accounts, and roles are defined using the principle of least privilege. For example, developers can only access the Dev environment, while only the operations team can access the Prod environment.
VPC and Networking:
A separate VPC or isolated subnets within the same VPC are defined for each environment. Private service access is established via Private Service Access, VPN, or Interconnect.
Security and Compliance:
Cloud Armor: DDoS protection
Secret Manager: Management of sensitive data such as API keys, passwords, and private keys
KMS (Key Management Service): Cryptographic key management
Audit Logs & SCC (Security Command Centre): Traceability and compliance control
CI/CD Pipeline:
Applications are automatically moved from Dev → Test → Prod using Cloud Build, GitHub Actions, or Jenkins.
Terraform or Deployment Manager is preferred for Infrastructure as Code (IaC).
Cloud Build → Tests → Artifact Registry → Cloud Run/Kubernetes Engine deployment
Monitoring & Logging:
Cloud Monitoring & Cloud Logging: Metrics and logs are centrally monitored for each environment.
Alerting: Email or Slack alerts for critical errors
Step 1: Planning Environment Layers
One of the most important principles in a landing zone is environment separation. Each stage of development has its own purpose:
- Development (Dev): A flexible environment where engineers experiment, test new ideas, and move quickly without fear of breaking production.
- Test / QA: A controlled environment to validate integrations, run performance checks, and debug issues.
- Staging (Pre-Prod): A near replica of production, running on realistic data. It acts as the final safety net before release.
- Production: The live environment where financial transactions are processed, requiring the highest standards of security, resilience, and uptime.
This separation isn’t bureaucracy; it’s risk management. Without it, small mistakes in development could easily cascade into outages or compliance breaches in production.
Step 2: Identity and Access Management (IAM)
Security begins with access control. The principle of least privilege must be strictly applied. A developer working in Dev should not have rights to query live customer data in Prod. Likewise, service accounts should be narrowly scoped to their tasks.
For example, a service account with read-only permissions to BigQuery cannot accidentally delete or modify datasets. Managing IAM policies centrally at the folder or organisation level avoids inconsistency and helps enforce compliance across all projects.
Step 3: Network (VPC) Design
The network architecture serves as the foundation for secure and efficient traffic management within the Landing Zone. To ensure strong isolation and controlled connectivity:
Shared VPC Model: A shared Virtual Private Cloud (VPC) is provisioned as the central networking layer, enabling standardised governance and consistent policies across all environments.
Strict Environment Separation: Clear boundaries are enforced between environments (Development, Staging, and Production). For example, the Development environment cannot directly communicate with the Production environment, minimising the risk of unauthorised access, data leakage, or unintentional interference.
Firewall Rules: Network firewall rules are defined with the principle of least privilege. Only approved ports, services, and protocols are allowed, ensuring that each workload can communicate only with explicitly permitted resources.
Controlled Access to Data: Developers working in lower environments (such as Dev or Test) are prevented from reaching sensitive production systems, reducing the risk of accidental exposure to live data.
Restrictions: Backend services are designed with no direct public ingress or unrestricted egress. Instead, outbound traffic to external third-party APIs must pass through a secure proxy layer, providing centralised monitoring, logging, and control. This enhances isolation and prevents data leaks.
Step 4: CI/CD, Artifact Registry, and Environment Separation
Automation plays a critical role in moving code from development to production. There are two key elements in this process:
Artifact Registry (Docker Image Repository)
A single Artifact Registry repository is used for all environments. Environment separation is achieved using a tagging strategy.
For example:
- payment-service:41-stage → tested in Staging
- Once approved, the same image becomes payment-service:41-prod
This prevents the classic “works in Staging, breaks in Prod” scenario and makes rollbacks simple.
CI/CD Pipeline
A pipeline should be set up using Cloud Build or GitHub Actions. The process typically works as follows:
- Code commit → Docker image build.
- The built image is pushed to Artifact Registry (payment-service:41).
- Automatic deployment to the staging environment.
- Tests successful → Manual approval → The -prod tag is added to the same image.
- The exact same image is deployed to the production environment.
This process ensures quality while maintaining fast and reliable deployments.
Step 5: Managing Infrastructure with Terraform and Atlantis
Managing cloud resources manually is a recipe for errors. Therefore, all infrastructure should be managed using the infrastructure as Code (IaC) approach with Terraform.
Environment Separation
Each environment has its own configuration files, while shared modules enforce consistency across projects.
- environments/dev/
- environments/staging/
- environments/prod/
Recurring resources are defined under shared modules (`modules/`)
Terraform Automation with Atlantis
Integrating Terraform with Atlantis adds automation and governance. Atlantis automatically applies Terraform changes via pull requests (PR).
- The developer submits the Terraform code by opening a PR.
- Atlantis runs terraform plan automatically and posts the results for review.
- Once approved, terraform apply is triggered.
This workflow eliminates risky manual commands, ensures all changes are peer-reviewed, and creates a clear audit trail of who changed what, when.
Step 6: Observability
In fintech, downtime or hidden errors are unacceptable. Observability ensures you always know what’s happening. To achieve this:
- All logs are centrally collected using Cloud Logging.
- Metrics are monitored using Cloud Monitoring.
- Alerting mechanisms are set up to ensure the team is notified immediately when issues arise.
Landing Zone in Practice: A Multi-Environment Setup on Google Cloud
The diagram represents a multi-environment GCP architecture for a fintech application built with a Flutter mobile client and backend services such as payments and wallets.

- Traffic Flow: Requests move from the Flutter app via HTTPS REST APIs into a public-facing layer, handled by APIGEE API Gateway in a public subnet, and routed through a Global HTTP(S) Load Balancer.
- Backend Services: The load balancer distributes requests to Cloud Run services (Payments and Wallet) using proxies and routing rules.
- Data Layer: Backends connect privately to Cloud SQL (transactional data) and BigQuery (analytics, reporting, ML, dashboards) within a private VPC.
- Security Boundary: Public ingress is shared for efficiency but separated from private, environment-isolated workloads. This ensures secure, scalable communication without direct public exposure.
Why Use One Project for APIGEE?
A single shared project (e.g., fintech-apigee-shared) centralizes APIGEE management and avoids redundancy.
Key benefits:
- Environment Separation: Supported through configurations like virtual hosts, environments (test/acc/prod), and target proxies (payment-proxy-dev, payment-proxy-prod).
- Access Control: Per-proxy API keys and IP allowlists control environment routing.
- Efficiency: Reduces infrastructure duplication, simplifies updates, and lowers costs.
- Landing Zone Alignment: Provides a unified "front door," with proxies enforcing strict isolation between environments.
Why Four Separate Projects for Dev, Test, Acc, and Prod?
Create four projects: fintech-dev, fintech-test, fintech-acc, fintech-prod under environment-specific folders within the Landing Zone.
Advantages:
- Isolation: Prevents cross-environment risks such as data leaks or resource contention.
- Governance: Independent billing, quotas, audit logs, and IAM policies per environment.
- Flexibility: Dev/Test allow experimentation with lower-cost tiers; Acc mirrors Prod for realistic validation; Prod ensures compliance (e.g., PCI-DSS).
- Networking: Uses a shared private VPC with environment-specific subnets. Traffic routes through the shared APIGEE/load balancer to environment-specific backends.
Managing Services in Each Project
- Cloud Run: Deploy containerized payment and wallet services per project. Scale independently and use revisions for safe, no-downtime updates.
- Cloud SQL: Provision instances with private IPs (e.g., PostgreSQL). Enable HA and backups in Acc/Prod, and connect via Private Service Connect.
- IAM: Assign least-privilege roles per project. Use workload identity for secure service-to-service authentication.
- BigQuery: Create datasets per project for analytics, ML models, and dashboards. Apply row-level security to isolate Prod data.
Managing Resources with CI/CD Using Terraform and Other
All resources - projects, APIGEE, VPCs, Cloud Run, Cloud SQL, IAM, BigQuery, should be managed as code for reproducibility and auditability.
Recommended setup:
- Terraform as IaC: Declarative provisioning across all environments.
- Modules: Reusable modules for shared resources (modules/apigee, modules/cloud-run).
- Environment Variables: Use variables (e.g., var.environment = "dev") for environment-specific configuration.
- State Management: Store state in Cloud Storage buckets per environment for isolation. Reference shared resources with remote state data sources.
- CI/CD Integration: Combine with Cloud Build, GitHub Actions, or GitLab CI to automate workflows (build → test → deploy).
APIGEE (Shared Project)
- Use the google_apigee Terraform provider to manage organizations, environments, and proxies.
- Apply linting and validation steps (terraform validate, APIGEE lint tools) before deployment.
Maintain proxies centrally, with environment separation enforced through configuration.
CI/CD Workflow (Example with Cloud Build)
A typical CI/CD pipeline could look like this:
- Trigger: Git push or PR (branch-driven: main for prod, develop for dev/test, staging for acc).
- Build: Run terraform init/plan and build Docker images.
- Artifact Storage: Push built images to Artifact Registry.
- Deploy to Staging: Automatic deployment for testing.
- Approval Gate: If tests succeed, a manual approval promotes the same image to Prod.
This ensures that the exact same artifact tested in staging runs in production, minimising rebuild risks and simplifying rollbacks.
Benefits of This Approach
By combining Terraform, APIGEE, Cloud Build, and CI/CD pipelines, you get:
- Idempotency: Same results every time deployments run.
- Auditability: Full visibility into who changed what, and when.
- Security: Isolation of environments, least-privilege IAM, and controlled ingress/egress.
- Operational Efficiency: Reduced manual effort and minimised configuration drift.
- Scalability: Shared efficiency at the ingress layer, with strict separation for backend services.
Conclusion
A well-structured Google Cloud Landing Zone isn’t just relevant for fintech. Whether you’re building an e-commerce platform, a SaaS product, or a data-driven application, the principles remain the same.
By starting with a solid Landing Zone, your team can focus on delivering features and value, instead of worrying about infrastructure pitfalls. This approach lays the groundwork for growth, innovation, and resilience on Google Cloud.
Not sure where to start? Feel free to reach out, we’ll be happy to discuss your project.


%20(1).png?width=75&height=75&name=Contact%20Services%20(800%20x%20800%20px)%20(1).png)
